The hard work is done! Having considered what makes a good exhibit, explored a collection, chosen your objects, written your exhibit brief, and written your story and labels, you are now read to create an digital exhibit using Artsteps! Artsteps allows you create a virtual gallery that contains all of your objects (regardless of format). Using the layout and guided tour feature, you can make it clear to visitors in what order they should look at each object. You will also make it clear what you want visitors to learn, as in addition to the introductory label to your entire exhibit, each object will have an exhibit label that provides just enough information.
1. Create your space
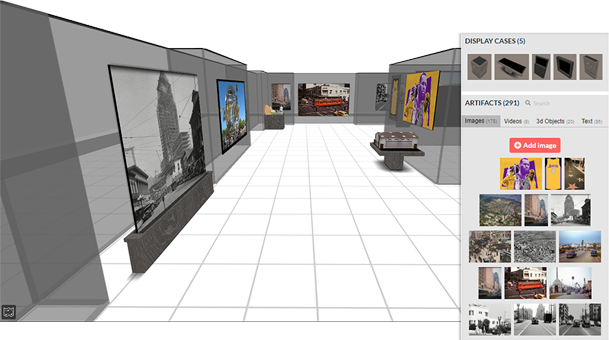
Artsteps allows you to use templates of beautiful galleries or create your own. Even if you want to use a template, watch all of this video as it will give you the information you need to use the app.
2. Design Your Space
Remember how in your Exhibit Brief you described the mood or tone of your exhibit? That mood will help you decide what colors and textures you want to use on your floors and walls.
3. Add and Place Artifacts
In this video you will learn not only how to place your objects in the gallery, but also how to add “text.” This is how you will add the introduction to your exhibit, but also how you will add exhibit labels for each item. Don’t forget to add source information for your objects! You may also decide that you want to use labels (and/or wall colors) to clarify the main themes that support the thesis of your exhibit.
4. Plan a Guided Tour
Artsteps allows you plan a guided tour of your gallery. This is a way to narrate your tour and ensure that people move through the gallery in the order you prefer. Notice that there is also an option to record audio to accompany your tour. Here is an example how that works.
5. Publish Your Exhibition
Remember when you created a list of items for your exhibit and you thought about permissions? That information is relevant for how you will share and publish your exhibit. If you don’t want to make it public because of copyright issues, instead of clicking to make your exhibit public, use quicktime to record a screen capture of the guided tour you created. Then send the video to your professor. Creating a video is also a great way to add options for your visitors to check their understanding of what you are presenting by inserting polls and questions. Interactive videos on this website were created using H5P, but you can also use polleverywhere and place links in your video descriptions.
That’s it! If you want to double check your work ask yourself how well you achived the goals of a good exhibit. Do you think visitors will find that you:
- Made the subject come alive
- Got the message across quickly
- Helped people understand the points quickly
- Allowed people to test themselves to see if their ideas were right
- It involved you, the visitor
- It made a difficult subject easier
If the answer was no to any of the above, what can you do to improve your visitors’ experiences?
If you would like to share your exhibit with other people around the world, please send it in an email to leibman@reed.edu and we will include it below. To ensure that we see it in a timely fashion, please include the subject line “Artsteps Virtual Exhibit Jewish American History.”
Here are a few examples of exhibits created by students at Reed College:
- Alyssa Feigelson, The Jews of San Francisco, 1840s-1980s https://www.artsteps.com/view/608b1c28b537a0053e13aaf8
- Caitlin Berrol, Paramaribo: Jewish Excellence in the Face of Adversity https://www.artsteps.com/view/608b1c4590c9bb02f3aab6d5
- Rafael Monkarsh, Chicago by way of Canada: An Exhibition of Jewish Life in Chicago since the 19th Century https://www.artsteps.com/view/608b1f9480ab61fef16cfb51
- Jesse Weiss, The Jews of Bridgetown, Barbados Exhibithttps://www.artsteps.com/view/608b214757251301ad3fd222
If you want to take a guided tour, press play at the bottom of the exhibit, or you can move around on your own. If you want to know more about any item, click on it. If you like the exhibits, sign in and leave them feedback!